
The Settings tab is where you can access, monitor, and modify all of your cameras, connection health, and user and account information. Some sections of the Settings tab are only accessible to users with administrator permissions. Make sure you have correct privileges when attempting to modify your cameras and sites settings.
Setting Up: Cameras
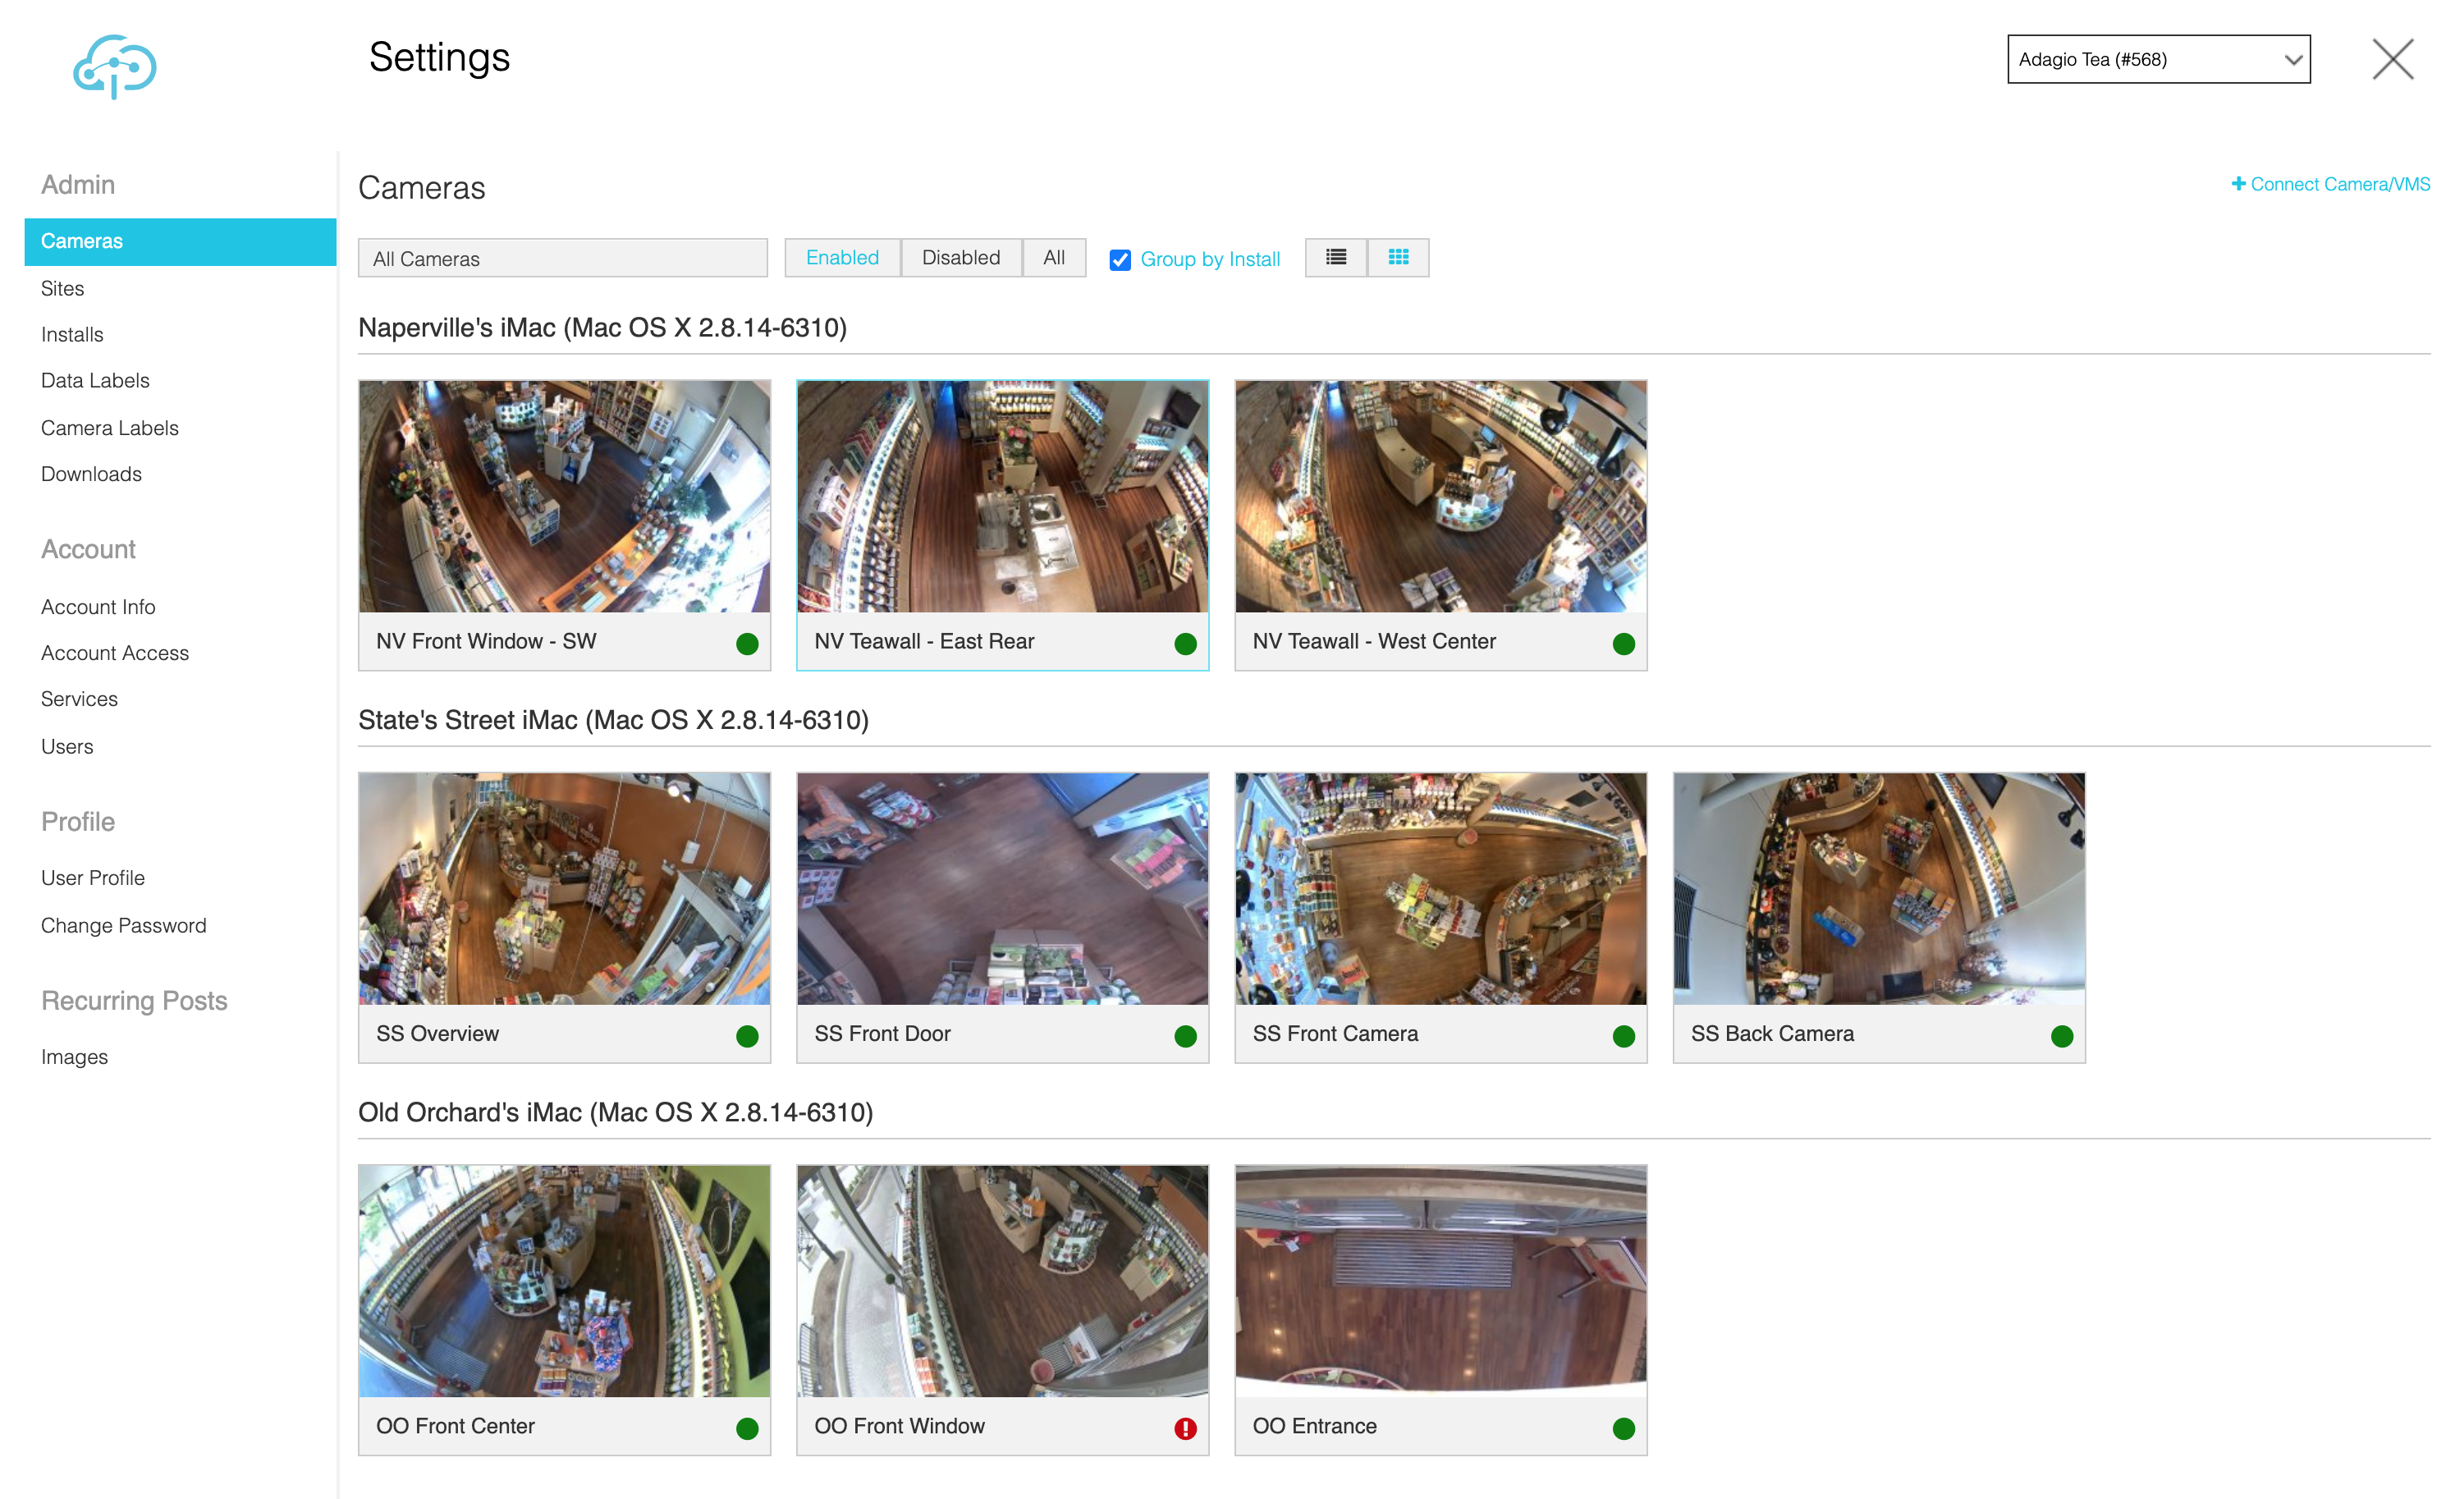
The Cameras tab located in the Settings page is where your account’s cameras are displayed. By default, all cameras are displayed (enabled and disabled). You can use the top navigation bar to select which cameras are displayed, as well as how they are organized. One Site can have multiple Installs.
In the upper right-hand corner of the top navigation, you will see a “+ Connect Camera/VMS” link. Click this link to view a dropdown menu, and select either “Connect Camera,” “Connect VMS,” or “Connection Request History.”
Connect a Camera or VMS
Clicking “Connect Camera” or “Connect VMS” will launch a lightbox where you can scan for new cameras or VMSes on your network, or select and input the IP address for a specific device to connect to Ignite Prism. This is also where you will select the Install to associate your camera with.
- If necessary, click “Advanced Options” to enter the specific port, protocol, or path you wish to use.
- You can remove or add cameras to a specific Install group in the Install page, accessible from the left-side panel in the Settings tab.
Cameras Settings Page
Click an individual existing camera to either enable it if it is currently disabled, or to view and edit its details if it is currently enabled. In the individual camera screen, you can:
- Add and delete labels you wish to associate the camera with.
- Check or uncheck lenses to use with your camera.
- Enable Advanced Analytics and draw Tripwires or Areas of Interest (AOI).
- View the camera’s IP address and device credentials.
- Edit the camera calibration.
- Enable video cache settings (Minimum 32GB SD card required for embedded cameras).
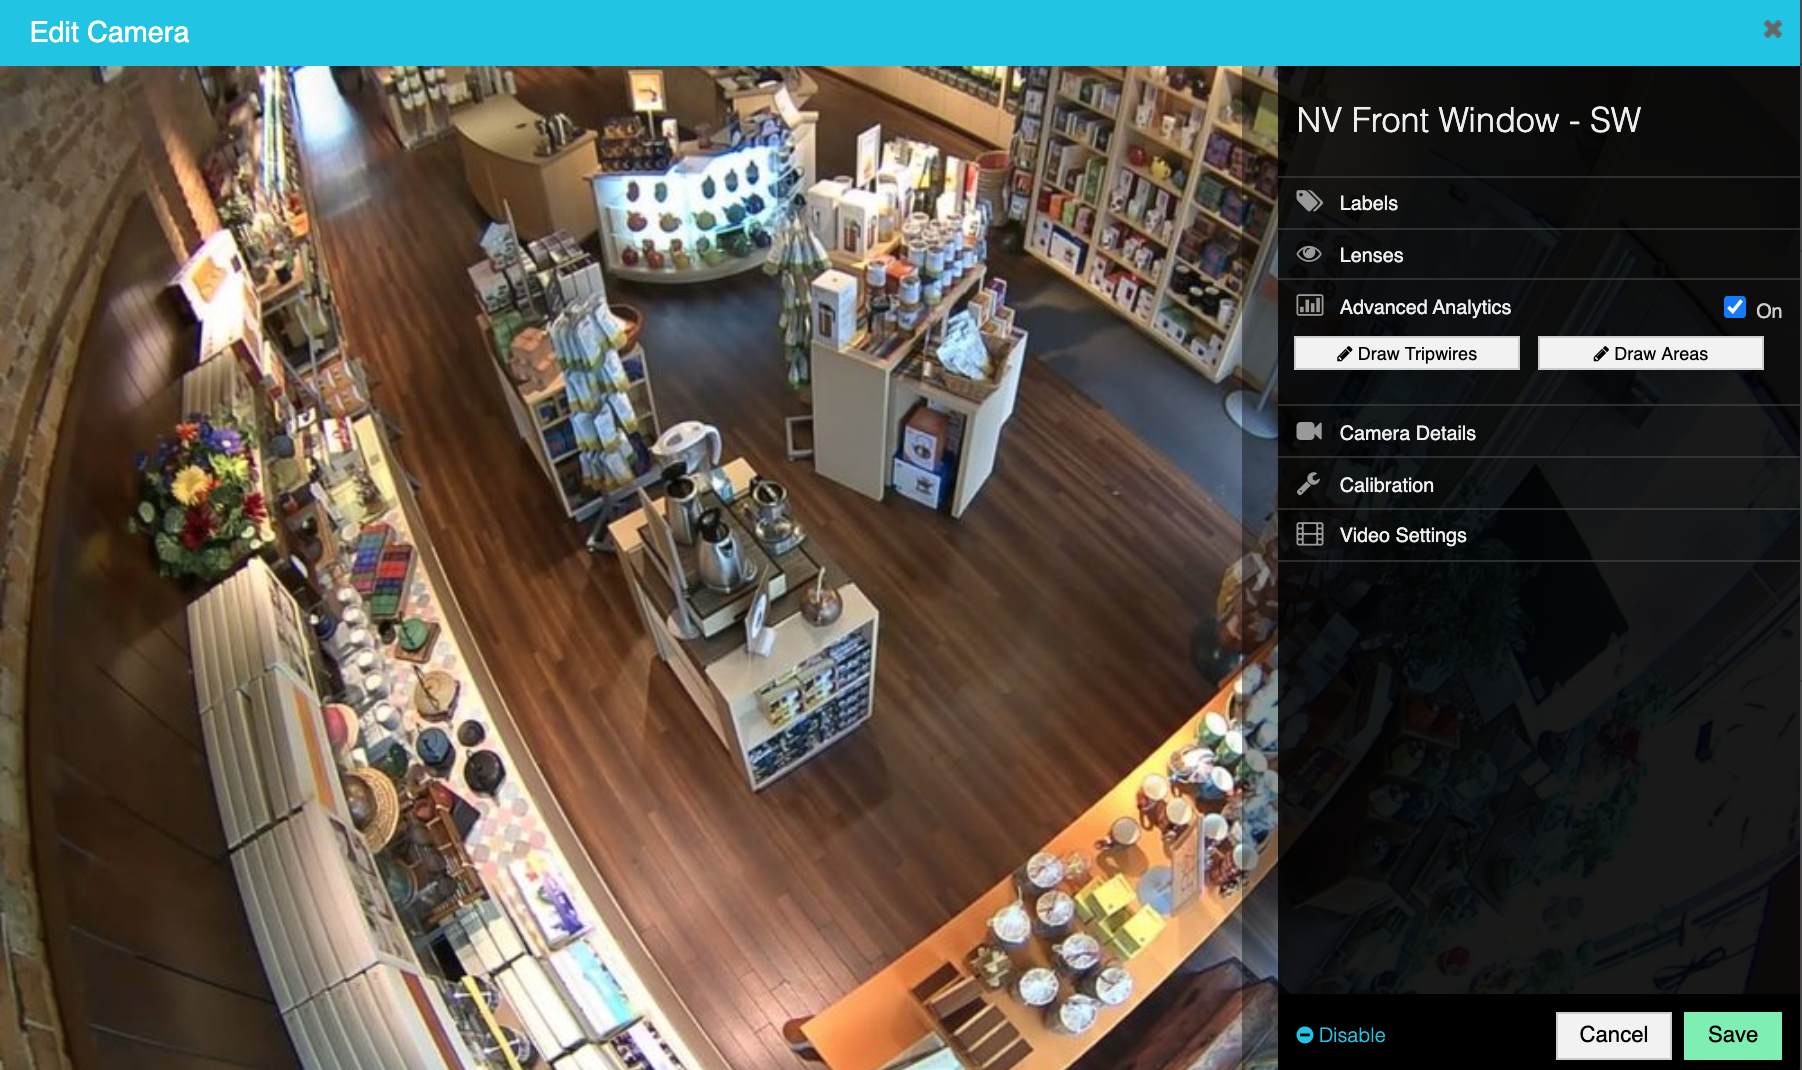
In the individual camera screen, click on “Labels” to add a label for the camera. Labels are used to sort and filter cameras for easier access. We recommend using labels to group cameras by a store, geography or area of the store, i.e. point-of-sale.
You can also create and edit labels on the Camera Labels tab, accessible from the left-side panel in the Settings page.
Selecting Lenses
Lenses are analytic overlays applied to your cameras to improve the value of your in-store visual access. You can apply the following lenses:
- Enhanced Lens
- Activity Lens
- Detail Lens
You can read more about these lenses in the Camera Lenses section.
Setting Up Counting: Count Types
You can configure multiple ways to understand in-store traffic with Ignite Prism. Below are the different types of counts:
- Footfall Counting: Provides a highly accurate count of people crossing a line ("tripwire") in a given camera's field of view. This counting can be configured to track both people entering the store and people visiting specific areas of the store.
- Occupancy Counting: Displays how many people are in a configured Area of Interest (AOI) at a given time, and the zone’s busiest hour of the selected day.
- Dwell Counting: Displays how long people spend in any Area of Interest. Dwell shows the average number of seconds people stay in an area, and highlights when the busiest times are.
- Pathmaps and Traffic Heatmaps: Pathmaps highlight customer movement patterns. In any area, they can display what percentage of customers go left, right, or straight. Traffic heatmaps identify and highlight varying areas of traffic, allowing you to understand the least and most popular areas of customer activity.
Setting Up Counting: Tripwires and Area of Interest
Tripwires are used for people counting. They track directional flow of the individual paths that cross them, and can be used for entry counting.
You can draw up to three tripwires on a given camera view by clicking “Draw Tripwires” in the Advanced Analytics section of an individual camera view.
Area of Interests (AOI) are a set of closed-shape tripwires used to measure the paths of customers in a particular space. They are usually constructed around certain departments, aisles, or displays in order to measure the amount of time customers spend in that space, how many customers visit it, or how many customers are in that space at a specific time on average.
You can draw areas on a given camera view by clicking “Draw Areas” in the Advanced Analytics section of an individual camera view.
- Areas can be associated with Data Labels in order to generate reports that measure one area’s metric across multiple Sites with the same Data Label.
- You can also modify and add Data Label and Data Label-Site associations in the main Data Labels page, accessible from the left-hand panel in the Settings tab.
Verify Your Cameras Are Working
On the Cameras page, you can check the status of your camera by moving your mouse over the green or red dot at the bottom right of each individual camera view. If the dot is green, your camera is enabled and online. If the dot is red, your camera may be offline.
You can also verify if your camera is working by selecting the camera you want to check in the Cameras page, and using the arrows on the sides of the primary viewing window to move back and forth through time. This way, you can verify that a recent image appears.
Comments
0 comments
Please sign in to leave a comment.